Empowering Document Analysis Unveiling AWS Textract, Comprehend, and S3 Integration
Empowering Document Analysis Unveiling AWS Textract, Comprehend, and S3 Integration
Introduction
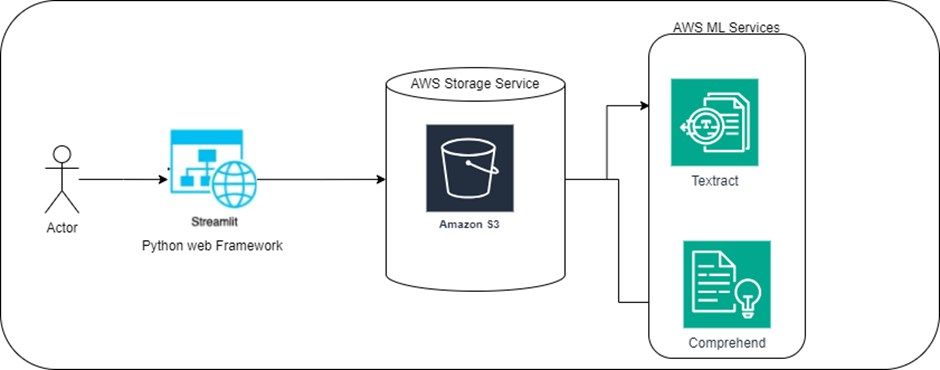
Hey everyone, glad to have you here for another interesting blog post! Recently, someone asked me for help—they wanted to figure out the feelings in their documents based on the words inside. In this tutorial, I’ll walk you through the basics of creating a solution for that. I’ll demonstrate how to combine Amazon Textract, Amazon Comprehend, and Amazon S3 into a Streamlit app.
Here’s the plan
We’ll start by putting your data on S3, then use Textract to pull out all the text, and finally, use Comprehend to find the main bits. I’ll even show how to do a sentiment check on the data, though it’s not something I need for this specific task. Sentiment analysis is a common way Comprehend gets used, so it’s worth a peek!”
Prerequisites for Getting Started
Python Environment Setup: Make sure your Python environment is up and running smoothly. If you haven’t set it up yet, ensure you have Python installed, preferably using a package manager like Anaconda or PIP.
AWS SDK Configuration: Setting up the AWS SDK (Software Development Kit) is crucial for seamless integration. Ensure you’ve installed the AWS SDK for Python (Boto3) and properly configured your AWS credentials using the AWS CLI (Command Line Interface) or through environment variables. This step is vital for accessing AWS services programmatically.
AWS Account: You’ll need an active AWS account to access and utilize Textract, Comprehend, and S3 services. Sign up on the AWS website if you don’t have an AWS account.
Once you’ve checked off these prerequisites, you’ll be all set to dive into integrating Textract, Comprehend, and S3 into your Python environment and Streamlit application.
Understanding Amazon Textract and Comprehend
Amazon Textract stands as a powerful service designed to autonomously extract text and data from scanned documents, offering support for diverse formats such as PDFs and various image types. This service essentially acts as a sophisticated data retrieval system, capable of converting information locked within images or documents into machine-readable text.
On the other hand, Amazon Comprehend serves as a natural language processing (NLP) service that utilizes machine learning to uncover valuable insights and correlations within text data. Think of it as an intelligent assistant equipped to read and comprehend documents, deciphering emotions, language nuances, and key highlights.
The Synergy of Integration:
By integrating these two services, we transform raw data into actionable insights. This integration serves a multitude of purposes across different domains, including document processing, content management, and compliance monitoring. This amalgamation not only streamlines workflows but also significantly enhances accessibility to data and improves decision-making processes, proving to be invaluable for businesses and organizations dealing with substantial volumes of text-based information.
The functionality of the Application
Our application will sport fundamental yet potent features:
1. File Upload to S3: Users can upload files to the designated S3 bucket, providing the initial data source.
2. Display of S3 Bucket Files: The application will exhibit all files available within the S3 bucket, ensuring visibility and selection.
3. File Selection for Analysis: Users can pick a specific file from the displayed list for subsequent analysis.
4. Textract Text Extraction: Leveraging Textract, the application will extract plain text from the selected file.
5. Comprehend Text Analysis: The extracted text will undergo analysis using Comprehend, unlocking deeper insights and information.
The complete code for this application is accessible on my GitHub repository. Moreover, within this article, you’ll find the code provided in the correct sequence, guiding you step-by-step through the integration and implementation process.
Step 1: Building a Streamlit Application
Our initial Streamlit application will have two primary components:
– Main App: Here, we’ll showcase the selected image from the S3 bucket, the extracted plain text from that image, and the analysis provided by Comprehend.
– Sidebar: This section will allow users to upload files to S3 and choose the file for analysis.
To begin, create a new file named main.py.
Since this is a straightforward application, only four Python packages are needed
import streamlit as st
import pandas as pd
import boto3
from io import BytesIO
These packages serve various purposes:
– Streamlit: As the web app framework
– Pandas: For creating and displaying a data frame
– Boto3: For connecting to AWS services
– BytesIO: To create a file-like object from S3 data
The provided code initializes the Streamlit page, assigning it a title and creating a sidebar. This will serve as the foundation for expanding the application’s functionalities in the subsequent steps.
st.set_page_config(page_title=”AWS Comprehend, Textract and S3 with Streamlit”)
st.title(“AWS Comprehend, Textract and S3 with Streamlit”)
st.sidebar.title(“S3 File Upload”)
st.sidebar.markdown(“Upload a file to S3”)
To run the application as-is, enter the following command into your terminal
streamlit run main.py
Step 2: Uploading and Accessing S3 Data
This script integrates AWS services with a Streamlit app for file upload, storage, and selection. While implementing S3 functionalities, it’s crucial to handle exceptions and errors, particularly within AWS operations.
The initial lines initiate AWS Comprehend and Textract clients for text analysis and document text extraction, respectively. These services are set to the ‘eu-west-2’ region in this example, which you can adjust according to your preference.
The sidebar functionality is expanded to read from and write to S3. You’ll need to pre-create an S3 bucket using the AWS Console, and its name should be inserted into the ‘s3_bucket_name’ variable.
Amazon Textract only accepts PDF, PNG, JPEG, and TIFF filetypes so I have limited our file upload functionality to this. PDFs are excluded from this example as Textract handles them in a different, more complicated way due to the way they paginate.
The AWS functionality used here is via their boto3 python package. I first initiate the S3 resource. It requires the name of the S3 bucket which I provide via a pre-defined variable. The put_object function is used to upload the file selected with Streamlit’s file_uploader function. Using ‘if uploaded_file is not None’ means that the code block is only invoked when a file has been uploaded.
The code utilizes the boto3 Python package to initiate the S3 resource and handle file uploads. It also lists the contents of the S3 bucket, displaying available files in a select box using Streamlit.
# Check if there are any items in the s3 bucket, if there are, add them to the file_list, if there aren’t display a message
if ‘Contents’ in response:
for obj in response[‘Contents’]:
file_list.append(obj[‘Key’])
else:
st.write(“No files in S3 bucket”)
selected_file = st.selectbox(“Select a file from S3 bucket”, file_list, placeholder=”Select a file from S3 bucket”, index=None)
st.write(“You selected: “, selected_file)
Step 3: Displaying S3 Image in the Application
For this application’s testing purposes and to test Textract and Comprehend functionalities, displaying the selected image at the top of the page proves useful. The code checks if a file has been chosen in the sidebar and retrieves the necessary file from S3 for display using Streamlit’s image function.
Step 4: Extracting and Analyzing Images using AWS Textract and Comprehend
In the previous step, we established connections to both Textract and Comprehend. Now, these services come into play: first, Textract is employed to extract text from your image using the ‘detect_document_text’ function. This function is supplied with details of the selected S3Bucket and object. Textract processes the image and presents the text in its raw form within the Streamlit application. No specific text formatting is anticipated.
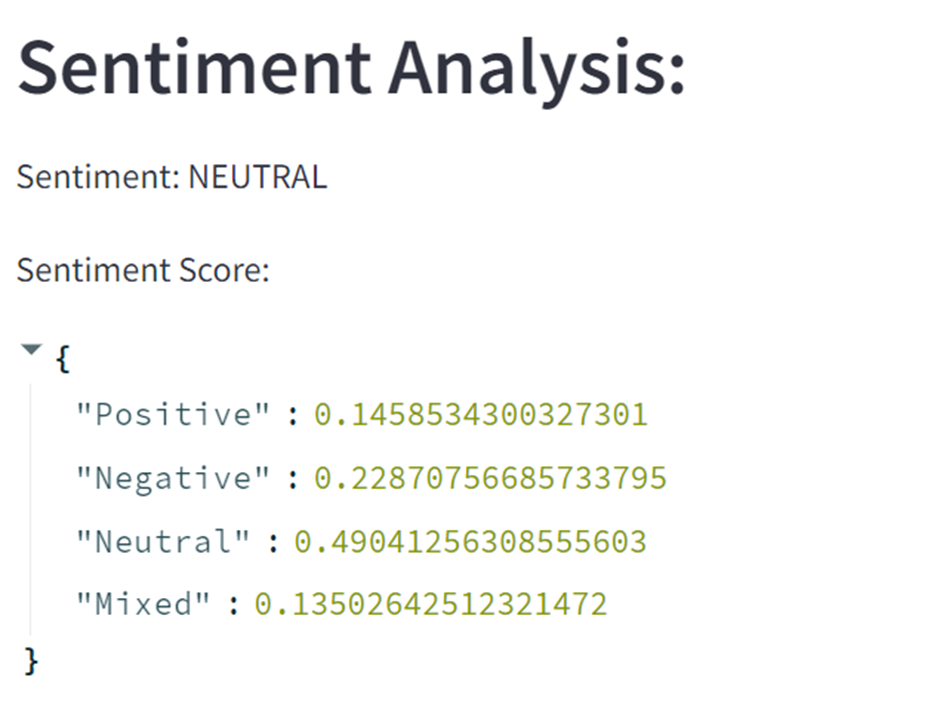
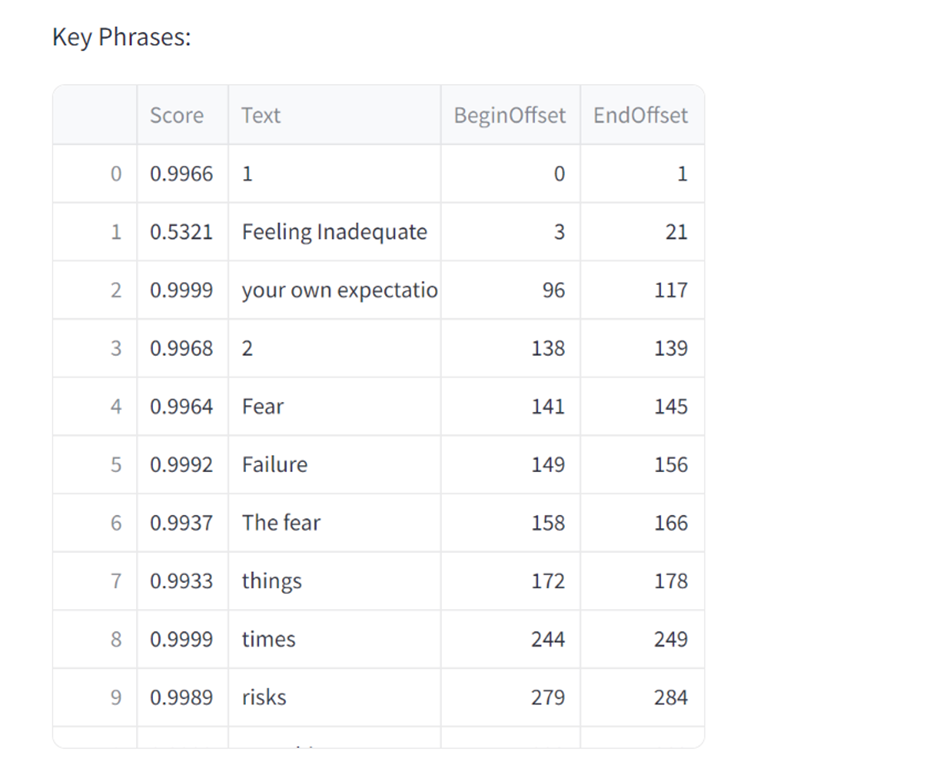
The subsequent three sections follow a similar pattern by employing Comprehend to analyze the text. Comprehend’s functionalities—‘detect_sentiment,’ ‘detect_key_phrases,’ and ‘detect_entities’—are invoked in sequence. For each function, the text is passed, and Comprehend is informed that the text is in English.
The ‘detect_sentiment’ function is utilized twice. Initially, it captures the overall sentiment—whether it’s positive, negative, mixed, or neutral. Subsequently, it furnishes a detailed breakdown of scores in each sentiment category. As for ‘detect_key_phrases’ and ‘detect_entities,’ their operations are quite analogous. Both functions are activated, and their results are presented in a dataframe format, elegantly displayed within the Streamlit interface.
Screenshots showing example results.
Conclusion
This Blog illustrates the creation of a Streamlit application amalgamating Amazon Textract, Amazon Comprehend, and Amazon S3 for reconciling bank statements and cheques. It encompasses steps like data uploading to S3, text extraction via Textract, and entity extraction plus sentiment analysis through Comprehend.
You can access the complete code on my GitHub repository. Additionally, forthcoming expansions will delve deeper into elucidating the comprehensive solution introduced earlier in this tutorial.
This blog post was written by Afjal Ahamad, a data engineer at QloudX. Afjal has over 4 years of experience in IT, and he is passionate about using data to solve business problems. He is skilled in PySpark, Pandas, AWS Glue, AWS Data Wrangler, and other data-related tools and services. He is also a certified AWS Solution Architect and AWS Data Analytics – Specialty.
Qloudx takes your privacy and security seriously.
We use cookies to collect information about you.
We use this information:
1. to give you a better experience (functional)
2. to count the pages you visit (statistics)
3. to serve you relevant promotions (marketing)
Click “ACCEPT” to give us your consent to use cookies for all these purposes.
Read more about how we use cookies to collect personal data: Privacy Policy
This website uses cookies to improve your experience while you navigate through the website. Out of these cookies, the cookies that are categorized as necessary are stored on your browser as they are as essential for the working of basic functionalities of the website. We also use third-party cookies that help us analyze and understand how you use this website. These cookies will be stored in your browser only with your consent. You also have the option to opt-out of these cookies. But opting out of some of these cookies may have an effect on your browsing experience.
Necessary cookies are absolutely essential for the website to function properly. This category only includes cookies that ensures basic functionalities and security features of the website. These cookies do not store any personal information.
Any cookies that may not be particularly necessary for the website to function and is used specifically to collect user personal data via analytics, ads, other embedded contents are termed as non-necessary cookies. It is mandatory to procure user consent prior to running these cookies on your website.